Getting Started
Thank you for purchasing Kulluu Creative Agency WordPress Theme. This documentation file covers all the information needed to install and use this theme. So before you get started, please check out these documentation files carefully.
If you will not understand anything in the documentation and about installing theme, please contact directly from our themeforest account. Our support team always read to help you quickly.
Please don't forget to give 5 stars rating and leave a nice review to kulluu. Your given rating and review help us for getting good sale. For doing so Simply log in into your Themeforest, go to Downloads section and click 5 stars next to the kulluu Creative Agency WordPress Theme.
Theme Requirements
To use Kulluu, you must be running WordPress 4.4 or higher, PHP 5.6 or higher, and MySQL 5 or higher.
Below is a list of items you should ensure your host support it..
- Make sure they are running the latest version of WordPress.
- Check to ensure that your web host has the minimum requirements to run WordPress.
- You can download the latest release of WordPress from official WordPress website.
Many issues that you may run into such as: white screen,400 error, 500 error, demo content fails when importing, empty page content and other similar issues are all related to low PHP configuration limits. The solution is to increase the PHP limits. You can do this on your own using cpanel, or contact your web host and ask them to increase those limits to a minimum as follows:
- Max_execution_time 300
- Memory_limit 128M
- Post_max_size 54M
- Upload_max_filesize 128M
Update
Before Updating :
- 1. It Is Always Recommended To Backup Your Current Setup Before Update Your theme
For take current backup of your site. Simply go to Theme Options >> Import / Export and export your backup. - 2. Do Not Keep Older Copies of The Theme In WP Theme Folder
You should completely remove all previous theme folders before adding the new updated theme folder. Don't just rename the theme folder. - 3. Reset Browser Cache, Server Cache And Plugin Cache
It is always recommended to reset your browser, plugin, and server cache when you update. Visual issues may happen and more often than not, its caused by caches, and they need to be emptied. - 4. Update Child Theme
If you have copied template files from parent theme to child theme, please make sure to revert to parent theme first to confirm if the issue exists there too. If it doesn’t, please update the templates copied to child theme with the parent theme. - 5. Required & Recommended Plugins Must Be Updated
When you update the theme, you will see a notification message in your admin telling you the required and recommended plugins need to be updated.
Update Theme:
Firstly, you need to download the new theme package from your Themeforest account. Once you have the new theme package, you can choose to upload the theme via WordPress or via FTP.
1. Update theme via FTP
- Step 1: If you have downloaded Installable WordPress file only, please unzip the zip file. If you have downloaded the All file & documentation package, please unzip again the kulluu.zip and kulluu-child.zip file.
- Step 2: Connect to your FTP.
- Step 3: Upload the extracted kulluu folder to: wp-content/themes/. Just replace existing files and folders.
- Step 4: Lastly, update the included plugins. You will see a notification message letting you know the plugins have a new version and need to be updated.
2. Update theme via WordPress
- Step 1: You need to deactivate the current kulluu theme in Appearance > Themes section by simply activating a different theme. Once you activate a different theme, you can delete the kulluu.


- Step 2: Retrieve the tm-Brook.zip file from your new Themeforest download. If you download All files & documentation, then you need to unzip the archive file you received, the tm-Brook.zip file will be inside of it.
- Step 3: Then simply upload and activate the tm-Brook.zip file in the Appearance > Themes section like you've done when installing theme
Installing the theme
In order to install the theme you need to have a WordPress copy already installed on your own server.
Below are some useful links for WordPress information:
- WordPress Codex - general information about WordPress and how to install it on your server
- First Steps With WordPress - general information that covers a wide variety of topics
- FAQ New To WordPress - the most popular FAQ's regarding WordPress
Install the theme from WordPress or FTP
NOTE: Once you have downloaded the theme package from ThemeForest you must unzip it and upload only the inner zip file named kulluu.zip.
Step by step instructions:
- Login to your WordPress site's administration area
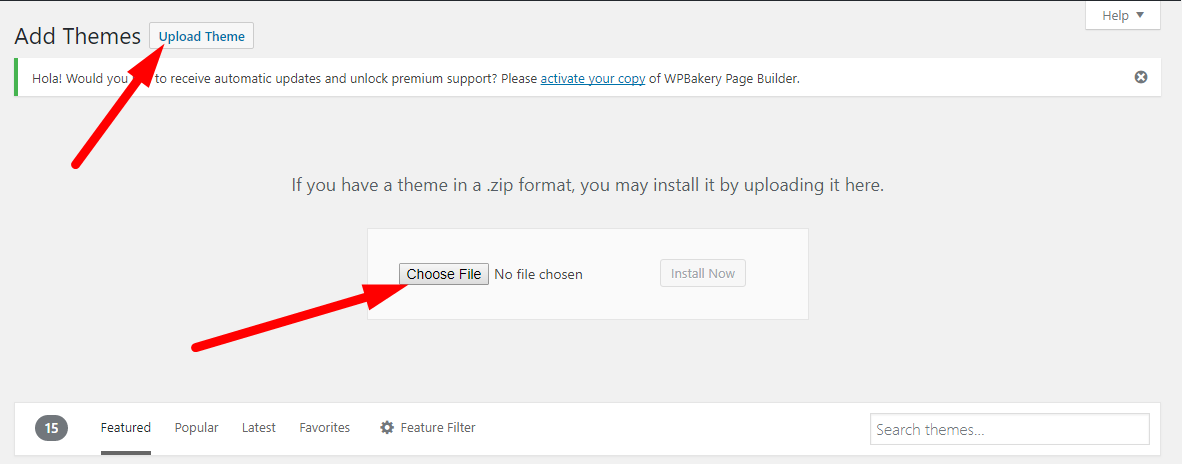
- Navigate to Appearance > Themes > Add New > Upload theme
- Click on the "Add New" button, then click on the "Upload Theme" button and also check below image
- Upload the theme zip file named kulluu.zip
- Click "Activate"
If this method fails we recommend uploading the theme via FTP. Open your FTP client, move to your WordPress installation path /wp-content/themes and upload the unziped kulluu folder.
After the upload is complete navigate to Appearance > Themes and activate the theme.
Install the child theme
Main download folder includes a child theme. A WordPress child theme allows you to apply custom code changes to your site. Using a child theme ensures your customizations will not be overwritten, even if you update the parent theme.
You can same way install child thene as like parent theme. You will get child theme under main files and name is kulluu-child.zip
Install theme required plugins
After the theme is installed a message box will appear requesting you to install 8 required plugins:

- RS Addon Plugin - theme core plugin
- Visual Composer - Premium content builder plugin
- Slider Revolution - Premium slider plugin
- Cl Testimonail Plugin - Premium plugin
- Contact Form 7 - available for download with WordPress plugin repository
- Mailchip For WP - plugin used for Newslellter subscription
- Breadcumbs Trail - plugin used for breadcumbs
- WordPress One Click Importer - plugin used for importing theme demo data
These plugins must be installed for the theme to work properly.
Plugins documentation and video tutorials
Visual Composer
Documentation: http://kb.wpbakery.com/
Video tutorials: https://vc.wpbakery.com/video-tutorials/
Revolution Slider
Documentation: https://www.themepunch.com/revslider-doc/slider-revolution-documentation/
Video tutorials: available on YouTube
Plugins licence
When you purchase a theme from ThemeForest that bundles Visual Composer and Revolution Slider, you are free to use these Premium plugins with the theme. However, your kulluu purchase does not give you individual Visual Composer and Revolution Slider licenses that allow you to activate or download these plugins as you wish. Activation doesn’t mean the plugin will not work but only that you cannot receive direct updates. Please don't worry if you see warning messages about the plugin license activation.
You can use these plugins with the kulluu theme and you are fully compliant with the Envato’s policy, but you cannot activate them as the owner (so don't try to use the kulluu purchase code to activate one of these plugins).
New plugin updates will be provided when we issue new theme updates. As soon as a new version is available for download, we will surely update the theme after we will fully test the plugins to make sure there are no bugs that will conflict with our own update. We will also fully test new theme versions before releasing them on ThemeForest.
Importing demo content
The fastest way to import our demo content is to use the Demo Content Importer. The Demo Content Importer provides you with all of Grassy’s pages and posts, sample sliders, widgets, theme options, assigned pages, and more. Using this import feature is recommended for fresh installs. The automatic import will NOT replace existing content however. We always recommend running it on a fresh WordPress installation.
- Make sure you have all the required plugins installed and activated.
- Navigate to Appearance > Import Demo Data .
- Then Click to Import Demo Data

- Wait until the import routine is done. Please be patient and don't navigate away, as this can take few minutes depending on your host's performance.
- You will be notified once the importing process is completed.
Slider Setup
- Navigate to Slider Revolution and then you can easily import slider check image also

- Form Main files you will get slider folder. Under slider folder you get zip file and Import those zip files for slider.
- After Import Slider Now you can check result now
Note: The "Internal Pages" can be imported without affecting your content.
IMPORTANT: Importing demo content will overwrite all existing option values, please proceed with caution!
How To Remove Duplicate Demo Content After Import
Method 1 : WP Reset Plugin
IMPORTANT NOTE Using WP Reset Plugin will REMOVE all of your database content. It does not remove a theme or plugin folder, but all site content such as posts, pages, media, etc. will be lost. USE WITH CAUTION!
This plugin is the fastest way to get back to the starting point of a WordPress install. However, it will remove all content from your database and leave the default theme activated. It does not remove plugins, but will deactivate them. This plugin will remove all pages, posts, menus, sliders, widget data, theme options, etc. Only do this if you are wanting to start over from a fresh WordPress install.
- Step 1 - Download and install the WP Reset Plugin.
- Step 2 - After installing the WP Reset Plugin, go to your WordPress plugins page and activate the plugin.
- Step 3 - Hover over your site name in the upper left corner of the screen and you'll find the 'Reset Site' option.
- Step 4 - You must first type reset in the text box before you can click 'Reset'.
- Step 5 - A warning pop up will appear informing you again that this action is irreversible. If you'd like to proceed, click 'Ok'.
- Step 6 - Once finished, you'll be left with a clean WordPress install. You can then re-activate Avada and the included plugins, then import the next demo you'd like to try or begin adding your own content.
Method 2 : Manual Removal
This method will take longer and requires more work but can be done if you want to only remove specific content and keep other demo content. This method simply involves manually removing/deleting the demo content items. For example, you would need to go to your "Pages" section and select the page or pages you want to remove and delete them. Repeat this process as needed through the various content areas in WordPress. You can use this method if you've already created pages and posts or edited some of the demo pages/posts and don't want to lose that work.
3rd Party Plugin Instal
If you need any third party plugin install in theme you should follow below steps:
- Login to your WordPress site's administration area
- Navigate to Plugins > Add New > Upload Plugins and check below image

- This way you can add plugins when your need
Theme Features
You can access the Theme Options panel by going to Navigate > RS Options. Theme various options are organized into vertical tabs on the left side.
General Sections
Logo - Main logo image
![]()
Favicon - Upload favicon image

Off Canvas - You can on/off off canvas here

Preloader - You can on/off preloader here

Go to Top - You can on/off top to bottom scroll here

Header
- Show Top Bar - Choose to display top bar on/off
- Show Social Icon Header Section - Choose to display social icon on/off
- Add top phone number - You can add phone number here
- Add Phone pre text here - You can add pre text here
- Email Address - Add email address here
- Qutoe Button text and Qutoe button link can add here

Header Layout
You can assign header style here form any one out of four

Style
Menu Color
You can add here different section style for your theme. If you change primary color it will chnage your site all major color

Typography
Body font settings - Font Family (Google fonts), Font Weight & Style, Text Align, Font Size, Line Height, Font Color
Headings font settings - Font Family (Google fonts), Font Weight & Style, Text Align, Font Size, Line Height, Font Color


Bullet Styling
We have 3 style bullet if you want any one use you can check 3 format coding style here
						UL Style 1 For arrow
						============================================ -->
						<ul class="stylelisting">
							<li>
								Test1 For Arrow
							</li>
							<li>
							</li>
								Test2 For Arrow
							<li>
								Test3 For Arrow
							</li>
						</ul>
						UL Style 2 For Check
						============================================ -->
						<ul class="time-listing">
							<li>
								Test1 For Arrow
							</li>
							<li>
							</li>
								Test2 For Arrow
							<li>
								Test3 For Arrow
							</li>
						</ul>
Blog
Blog Banner - Display a blog banner for blog main page
Blog Banner Title - Display a blog title on blog page
Display sidebar - Turn on/off blog sidebar
Display blog grid - You can assign here blog grid column as 2, 3, 4 column

Social Icon

404 Page
Page title - Default: 404
Text - Default: Page text can add here
Back to homepage button text - Default: Back to homepage
Background image - Upload a background image displayed as a cover and forced to full width

Footer
Upload Footer Logo - You can upload logo here
Social Icon - You can on/off social icon here
Copyright Text - Bottom footer copyright text
Footer Style - You can assign footer logo here.

Creating pages
For Make new page you can check below image:

- Create a separate page (as child of the master page - "Home") for each of the sections you would like to insert on the one page layout.
- The order of these sections is given by the "page order" attribute set for each page when created. Set the page order for each of these child pages (see screenshot below).

Page Layout and Page Header Settings
- You can setup page layout under all pages

Page Meta Settings
On the bottom of each page there are meta settings boxes. Here you can configure the following:
Slider Metabox


Setting up the Post type for Team, Portfolio, Career, Gallery, Testimonial, Clients and Services
- Navigate to Portfolio - Add New Portfolios
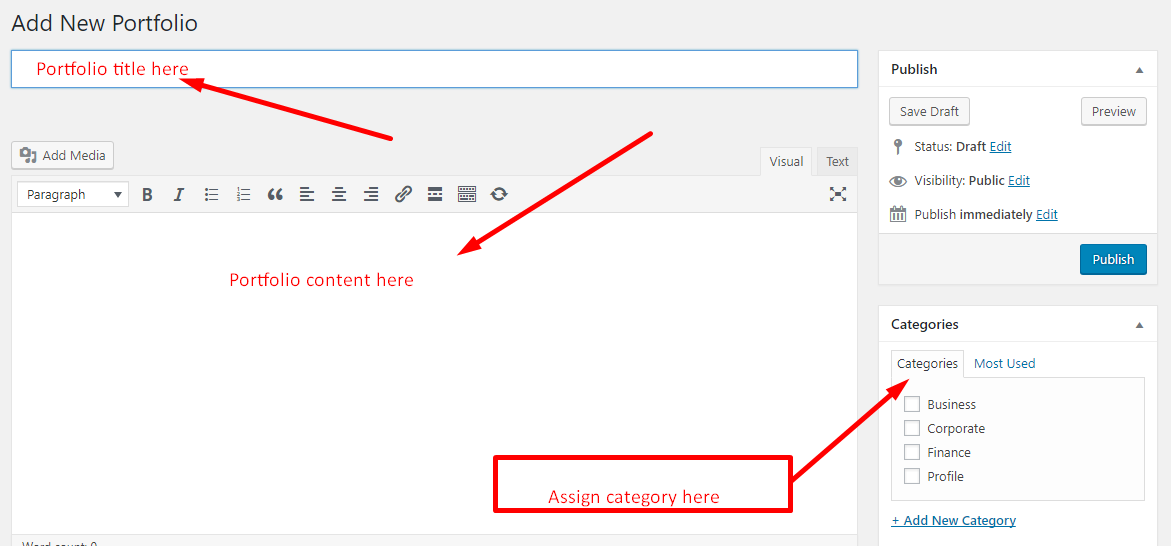
Same way you can add other elements under Team, Cl Testimonial, Career, Gallery, Clients, Services section
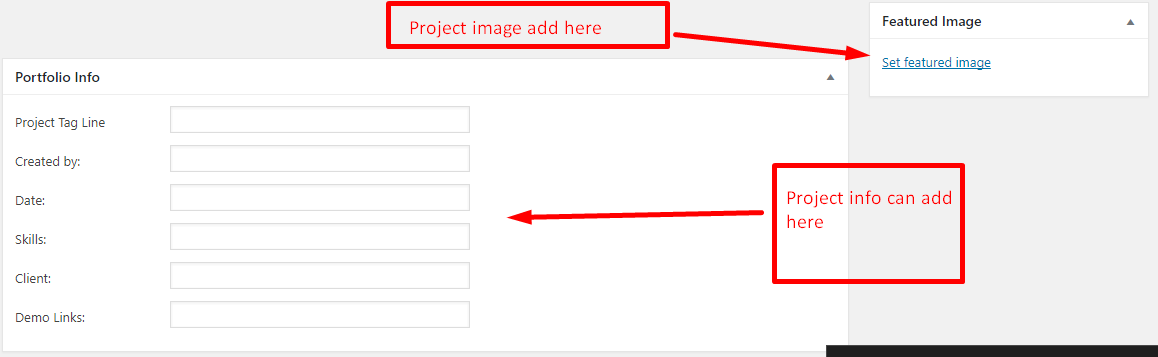
Addon Settings Portfolio

Team Addon Settings

Career Addon Settings

Gallery Addon Settings

Services Addon Settings

Setting up the menu
Navigate to Appearance > Menus and create your main menu. Inside the "Manage Locations" tab you can assign this menu as the Header Menu.
The theme features two menu locations: Header and Footer menu.
Menu items linking to section pages
To create a menu item linking to a section of the One Page template select Links from the left side panel and set the "URL" to #page-slug and "Link text" as the name of the menu item (eg. #about-us as URL and "About us" as Link text).
The left side panel box should look like this:

Menu items linking to stand alone pages
If you want to include a stand alone page menu item use the "Pages" tab, select desired page and click "add to menu".
Setting up the Mega Menu
To set up a mega menu make sure you follow the steps below:
1. Enable CSS classes
Scroll up and find the "Screen Options" at the top right of the Menu, and click on the drop-down arrow. The screen should look like this:

2. Create a new menu item for the Mega Menu
Go back to your "Menus" section and scroll to the "Custom Links" section on the middle left. Change the "URL" to ""#"", and change the label to whatever you want in your menu.
Now click on "Add to Menu", and your custom menu item will appear on your main menu list.
Next, click on the drop-down arrow of the menu item icon, and when the screen opens up, find "CSS Classes" and type mega-menu.

3. Add child menu items to your mega menu item.
See screenshot below:

Contact Form Setup
Grassy wp theme comes with contat form 7 plugin. You can easily setup this form
After login admin Navigate to Contact and click add new and check below image

Then Save contact form you will get shordcode and you can add this shorcode any page post or widget Check image also

Visual Composer
This section details the main elements and aspects of Grassy's unique application of the Visual Composer Page Builder. Discovering the different areas, icons and tools we have included will enable you to build beautiful pages quickly.How to use the page builder
In this overview, you will find everything you need to know about Visual Composer page builder; starting with how the most commonly used interface elements work. Visual Composer has everything you need to manage content elements with a single click: add, edit, duplicate, remove or create element presets, etc. You can also find some interesting video tutorials with VC Video Academy here: https://vc.wpbakery.com/video-tutorials/

1) Add elements
RS Elements gives you instant access to 10 built-in content elements. Each element has been carefully crafted, and offers multiple options. Simply insert elements into your page, click on the Plus Icons, and you’ll see an overlay window containing all the available modules. Select the one you want, and it will be inserted onto the page.
2) Drag and drop elements
With the intuitive drag and drop interface you can quickly change your layout or reorder elements. Simply drag elements or modules using the Drag Arrows Icon.
3) Open Settings
You can modify rows, columns, and module presets in seconds, and build complex layouts without using a single line of code. Simply open the setting from the Pen Icons. This will open a different overlay window for every module category with your options organized in convenient tabs.
4) Copy, paste and clone elements
One way to make page building proceed more efficiently is to go to use the copy, paste and close functionalities.
5) Custom CSS code
If you need to insert custom CSS code for use in a single page only, you can easily do so. The custom code will be stamped only for the page in question, and will not appear in any other page. At the top right corner, you will see a Gear icon. Click on it to open a code editor window and insert your custom code.
RS theme Elements Overview
Our RS Theme Addons plugin gives you instant access to built in content elements. Our Elments we developed based of our theme.
Element list overview:

Support
Again Thanks for purchasing this theme. If you need any help or any questions, please contact directly from our themeforest account. Our support team always read to help you quickly.
Thanks!
RS Theme
Profile Link: https://themeforest.net/user/rs-theme
Email: support@rstheme.com
Skype: "rubrash" or "msojib.cs".